Shotcut was originally conceived in November, 2004 by Charlie Yates, an MLT co-founder and the original lead developer (see the original website). The current version of Shotcut is a complete rewrite by Dan Dennedy, another MLT co-founder and its current lead. Enjoy the videos and music you love, upload original content, and share it all with friends, family, and the world on YouTube.
Bullets are the easy way to write your opinion point by point. There are many different ways to insert bullets on your Windows and Mac documents. In this article, let us explore all possible ways to insert bullets in Word, Excel, PowerPoint, Outlook and also on Pages, Keynote and Numbers.
Types of Bullets
You can use different styles of bullets for different purposes:
- Symbols – generally bullet point symbols are used for unordered list
- Numbers – use numbers for ordered list with counts
- Letters – similar to ordered list, with letters instead of numbers
- Custom images – small images in front of the sentences and aligned properly
- Font icons – generally used on web documents for showcasing
As you can see, above bullet points are useful to put our content in a simple way.
Inserting Bullets in Windows Documents
Shortcut Key For Cut And Paste On Mac
Follow one of the below instructions to insert bullets in Windows based documents.
#1 – Insert from Paragraph Group
The easy and common way is to insert a bullet from the “Home” menu under “Paragraph” group. You can choose unordered, numbered or multilevel bullet list.
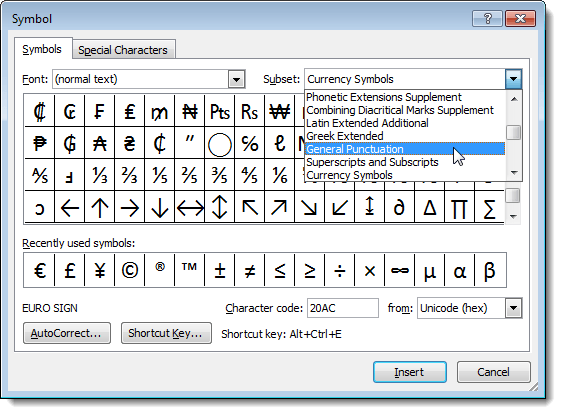
If you don’t like the existing bullet options, then click on the small arrow in the bullets / numbering / multilevel list. Choose “Define New….” Option. You can choose symbol, picture or font as your bullet.
- Click on “Symbol” button to the popup showing many special symbols. Change the “Font” to Windings and find more beautiful bullet symbols for you.
- Let’s say you want to use clubs symbol used in cards suit as your bullet. Choose “Clubs” symbol from the list.
- Click OK to apply your changes.
- You will see the clubs symbol appears in the bullets dropdown.
- Choose the clubs symbol from the bullet and start using on your document.
Note: Use tab to create threaded bullets with indentation. Word will create a new bullet symbol for each indent to show it different.
#2 – AutoFormat Options
Word and PowerPoint documents has an AutoCorrect option to insert bullets automatically. For example, type 1 then . and press space to create a numbered bulleted list. Similar to numbered list, you can also use other symbols like hyphen or letters to insert bullets. For example, type hyphen and press spacebar to create a bullets with hyphen. You will see the AutoCorrect options when you type like this.
Choose “Control AutoFormat Options” to change the settings, if you don’t want Word, Outlook or PowerPoint to create bullets automatically.
#3 – Alt Code Keyboard Shortcuts
The above two methods are the correct way to insert bullets. Because it will create bullets for each new line automatically. However, if you want to manually create bullets for few lines then you can use alt code shortcuts for this purpose. Below are some of the bullets shortcuts which you can use for typing bullets.
- Use the alt key and the decimal number keys from numeric pad.
- Alternatively, type the hex code then alt and x keys on Word documents.
| Decimal | Hex | Bullet | Description |
| Alt + 8226 | 2022 | • | Bullet |
| Alt + 8227 | 2023 | ‣ | Triangle Bullet |
| Alt + 8259 | 2043 | ⁃ | Hyphen Bullet |
| Alt + 8268 | 204C | ⁌ | Black Leftwards Bullet |
| Alt + 8269 | 204D | ⁍ | Black Leftwards Bullet |
| Alt + 8729 | 2219 | ∙ | Bullet Operator |
| Alt + 9688 | 25D8 | ◘ | Inverse Bullet |
| Alt + 9702 | 25E6 | ◦ | White Bullet |
| Alt + 9753 | 2619 | ☙ | Reversed Rotated Floral Heart Bullet |
| Alt + 10085 | 2765 | ❥ | Rotated Heavy Black Heart Bullet |
| Alt + 10087 | 2767 | ❧ | Rotated Floral Heart Bullet |
| Alt + 10686 | 29BE | ⦾ | Circled White Bullet |
| Alt + 10687 | 29BF | ⦿ | Circled Bullet |
| Alt + 9679 | 25CF | ● | Black Circle Bullet |
#4 – Insert Bullets on Microsoft Excel Worksheet
Bullets are meant for text documents and not for number processing software like Excel. However, if you want to add bullets in the Excel worksheet cell, the simple option is to type on Word and copy the content.
- On your Excel, double click on a cell and past the bulleted list.
- You can also manually use symbols like asterisk * and add bullets.
- Press “Alt + Enter” inside a cell to create a new line.
- Remember not to use hyphens as bullets as Excel will show formula error when you start a cell with hyphen.
Inserting Bullets in Mac Documents
#1 – Insert from Menu
On Mac documents with Pages or Keynote, you can insert bullets from the formatting sidebar. Select text or image bullet and choose the type to insert.
#2 – Assigning Keyboard Shortcuts for Bullets in Pages
When you choose the bullet type, click on the small arrow at the end. Choose “Shortcut” option and select the function key for the bullet.
After setup your shortcut, press Fn + F1 to F8 key to insert the corresponding bullet symbol.
#3 – Using Hyphens
Similar to Windows documents, you can also type hyphen to insert bullets on Pages and Keynote. However, the difference in Mac is that you need to type the content and press enter key to create a bulleted list.
#4 – Option or Alt Code Shortcuts
Use alt or option code shortcuts to insert bullet symbols in Mac. Hold option key and type the hex code in the above table to produce bullet symbols. In order to use this, you should have enabled Unicode Hex Input method as your keyboard input. For example, Option + 25CF will produce black circle bullet like ●.

If you're used to working with Excel on Windows, one of the most confusing aspects of using Excel on a Mac is shortcuts. Even basic shortcuts you've been using for years in Windows may not work as you expect.
After a few problems, you might wind up thinking that Mac shortcuts are 'totally different' or somehow 'broken'. In reality, Excel shortcuts on the Mac are quite capable, you just have to understand and adjust to certain differences.
In this article, I'll walk you through the key differences you need to be aware of to work productively with Excel shortcuts on a Mac.
Also see: Excel shortcuts on the Mac // 3 minute video
1. Special symbols
One of more confusing aspects of keyboard shortcuts on the Mac are the symbols you'll see for certain keys. For example, the Command key is abbreviated as ⌘, the Control key with ⌃, and the option key as ⌥. These symbols have a long history on the Mac, and you'll find them in menus everywhere.
The Mac Finder – abbreviations appear in all applications, not just Excel
You'll see these symbols in menus across all applications, so they're not specific to Excel. There really aren't too many symbols, so I recommend that you bite the bullet and memorize them. The table below shows some example shortcuts with a translation.
| Command | Shortcut | Translation |
| New workbook | ⌘N | Command N |
| Save As | ⌘⇧S | Command Shift S |
| Toggle ribbon | ⌘⌥R | Command Option R |
| Paste Special | ⌃⌘V | Control Command V |
| Select row | ⇧Space | Shift Space |
2. Function keys
Like their counterparts in the Windows world, Mac keyboards have function keys. These keys sit at the top of the keyboard and are labeled F1 to F12 on standard keyboards and F13, F14 and higher on extended keyboards.
Standard Mac keyboard with 12 function keys
As you know, function keys are uses for many shortcuts in Excel. For example, you can use F1 for help, F7 for spelling, and shift + F3 to insert a function. But if you try these shortcuts directly on a Mac, they don't work. Why?
By default, Function keys on a Mac control the computer itself, things like screen brightness, volume, video pause and play, and so on. This means that if press only the function keys in Excel, you'll end up controlling the Mac, and not Excel.
To make function keys work like you expect in Excel, you need to add a key: the function or fn key. You'll find the fn key in the lower left on your keyboard. Here are a few examples:
| Command | Windows | Mac |
| New chart | F11 | fn F11 |
| Calculate worksheets | F9 | fn F9 |
| Open Spelling | F7 | fn F7 |
| Evaluate formula | F9 | fn F9 |
If you really hate using the fn key, you can change this behavior by changing a preference at System Preferences > Keyboard. Here you can check a box that will that will change function key behavior to work like 'standard function keys'.
If you do this, however, note that you won't be able to use function keys for things like Brightness, Volume, etc. unless you hold down the fn key. In essence, this setting reverses behavior so that you need to use fn to control the Mac.
Personally, I like using the function keys to control the computer, so I leave this setting alone, and just the fn key when needed in Excel.
3. Missing keys
Another difference that may trip you up on a Mac is certain keys are missing.
Unless you're using an extended keyboard, keys like Home, End, backspace, Page up, and Page down are nowhere to be found. This is a problem, because many of these keys are used in Excel shortcuts. The solution is to use specific substitutions, as shown in the table below.
| Windows | Mac equivalent |
| Home | fn arrow left |
| End | fn arrow right |
| Page Up | fn arrow up |
| Page Down | fn arrow down |
| Screen right | fn option arrow down |
| Screen left | fn option arrow up |
| Move to Last cell | fn control arrow right |
| Move to first cell | fn control arrow left |
| Delete | fn Delete |
| Backspace | Delete |
The substitutions let you perform the same actions you can do in Windows. However, They can make some shortcuts seem complicated on a Mac because you have to use more keys.
Note: If you're using an extended keyboard on a Mac, you don't need to worry about substitutions, since you'll have keys for Home, End, Page up, etc.
Extended keyboards have all the keys
4. Ribbon shortcuts
In the world of shortcuts, perhaps the most painful difference on a Mac is a lack of ribbon shortcuts.
In Excel on Windows, you can use so called accelerator keys to access almost every command in Excel using only your keyboard. This doesn't matter much when you're performing an action that has a dedicated shortcut (i.e. Control + B for bold), since dedicated shortcuts are faster than ribbon shortcuts. But when you want to trigger an action that doesn't have a dedicated shortcut (like sort, hide gridlines, align text, etc.), it hurts a bit.
Excel ribbon in Windows with accelerator keys visible. No equivalent on the Mac!
5. Just different
Finally, some Excel shortcuts are just plain different on a Mac.
For example, the shortcut for Edit Cell in Windows is F2, and on a Mac, it's Control + U. The shortcut to toggle absolute and relative references is F4 in Windows, while on a Mac, its Command T. For a complete list of Windows and Mac shortcuts, see our side-by-side list.
If you want to see more Excel shortcuts for the Mac in action, see our our video tips. Whenever we use a shortcut, we show both the Windows and Mac version.
Excel 2016/Office 365
With the introduction of Excel 2016 on the Mac, Microsoft has started to adjust Mac shortcuts to be more aligned with Windows. As of February 2016, many Windows shortcuts can be used in Excel 2016/Office 365. For example, you can use fn + F4 to toggle between absolute and relative references, Control + Shift + L to toggle a filter on and off, etc. So far, all the shortcuts that have been adjusted to match Windows shortcuts remain backward compatible with previous Mac only shortcuts. For example while fn F4 toggles references on the Mac, the old shortcut Command + T still works as well.
More shortcut resources
- 200 Excel shortcuts for Win and Mac (online list)
- The 54 Excel shortcuts you really should know (article)
- Laminated quick reference cards (old school)
- Excel shortcuts course - (video training)
